Imagine a roasted chicken so tender, so infused with its own rich essence, that every bite practically melts in your mouth. For too long, the pursuit of crispy skin has overshadowed the quest for truly succulent meat. But what if we told you there’s a cooking secret, deeply rooted in a classic technique, that guarantees an incredibly moist, intensely flavorful bird every single time? Enter the world of French Chicken in a Pot.
This isn't about sourcing a beret-wearing poulet from the fields of Provence (though the image is certainly amusing!). Instead, the "French" refers to an elegant and ingenious cooking method that prioritizes moisture and depth of flavor above all else. Inspired by traditional French kitchen wisdom and perfected by culinary experts like those at Cook's Illustrated, this french chicken in a pot recipe redefines what you expect from a whole roasted chicken.
The Allure of French Chicken in a Pot: Beyond Crispy Skin
For many home cooks, the golden, crackling skin of a perfectly roasted chicken is the ultimate goal. While undeniably delicious, achieving this often comes at the cost of the meat's moisture, especially in the notoriously lean breast areas. The beauty of French Chicken in a Pot lies in its deliberate sacrifice of that crispy exterior for an unparalleled interior experience.
As championed by its proponents, this method yields meat that is "incredibly juicy and intensely flavored." The trade-off is more than worth it. You gain a depth of flavor and tenderness that traditional high-heat roasting struggles to achieve consistently. It's a culinary philosophy that understands true deliciousness often comes from patience and a nuanced approach, proving that sometimes, the simplest methods produce the most profound results.
This technique, often compared to the traditional French Poule au Pot (though distinct in its execution), focuses on creating an optimal environment for the chicken to cook in its own concentrated juices. It's a testament to the power of a tightly sealed pot and low, slow heat.
The Science Behind the Succulence: Why This Method Works
At the heart of the french chicken in a pot method is a brilliant scientific principle: cooking in a "dry pot" with no added liquid. This is where it fundamentally differs from braising, a common low-and-slow technique that involves cooking meat in an abundance of liquid. While braising creates tender, flavorful meat by allowing ingredients to mingle and exchange flavors in a wet environment, the French Chicken in a Pot technique aims for a different, more concentrated flavor profile.
According to the experts, in a dry, tightly covered pot, any juices released by the chicken during cooking are immediately reabsorbed. There's no dilution from broth, wine, or water. This creates a self-basting effect, ensuring the meat stays incredibly moist. Imagine the chicken essentially simmering in its own rich, unadulterated essence. This continuous re-infusion of natural juices builds an unforgettable flavor that is pure chicken, elevated.
The low oven temperature, typically around 250 degrees Fahrenheit, is another critical component. This gentle heat allows the chicken to cook slowly and evenly, giving collagen ample time to break down into gelatin without forcing moisture out of the muscle fibers. The result is fall-off-the-bone tenderness and unparalleled juiciness. For a deeper dive into this unique cooking style, explore our article on Dry Pot Cooking: Unlock Intense Flavor with French Chicken.
Crafting Your Perfect Pot of Poulet: Key Ingredients & Steps
One of the most appealing aspects of this method is its deceptive simplicity. You don't need a long list of exotic ingredients or complex steps. The magic truly lies in the technique and the quality of your core components.
Essential Ingredients for Deep Flavor
- Whole Roasting Chicken (4 1/2 to 5 pounds): Choose a good quality bird. The chicken is the star, so its inherent flavor will shine through. Remove giblets and neck.
- Kosher Salt & Freshly Ground Black Pepper: Simple seasonings that are crucial for enhancing the chicken's natural taste.
- Olive Oil: Used for an initial sear, it helps develop some foundational flavor before the slow cook.
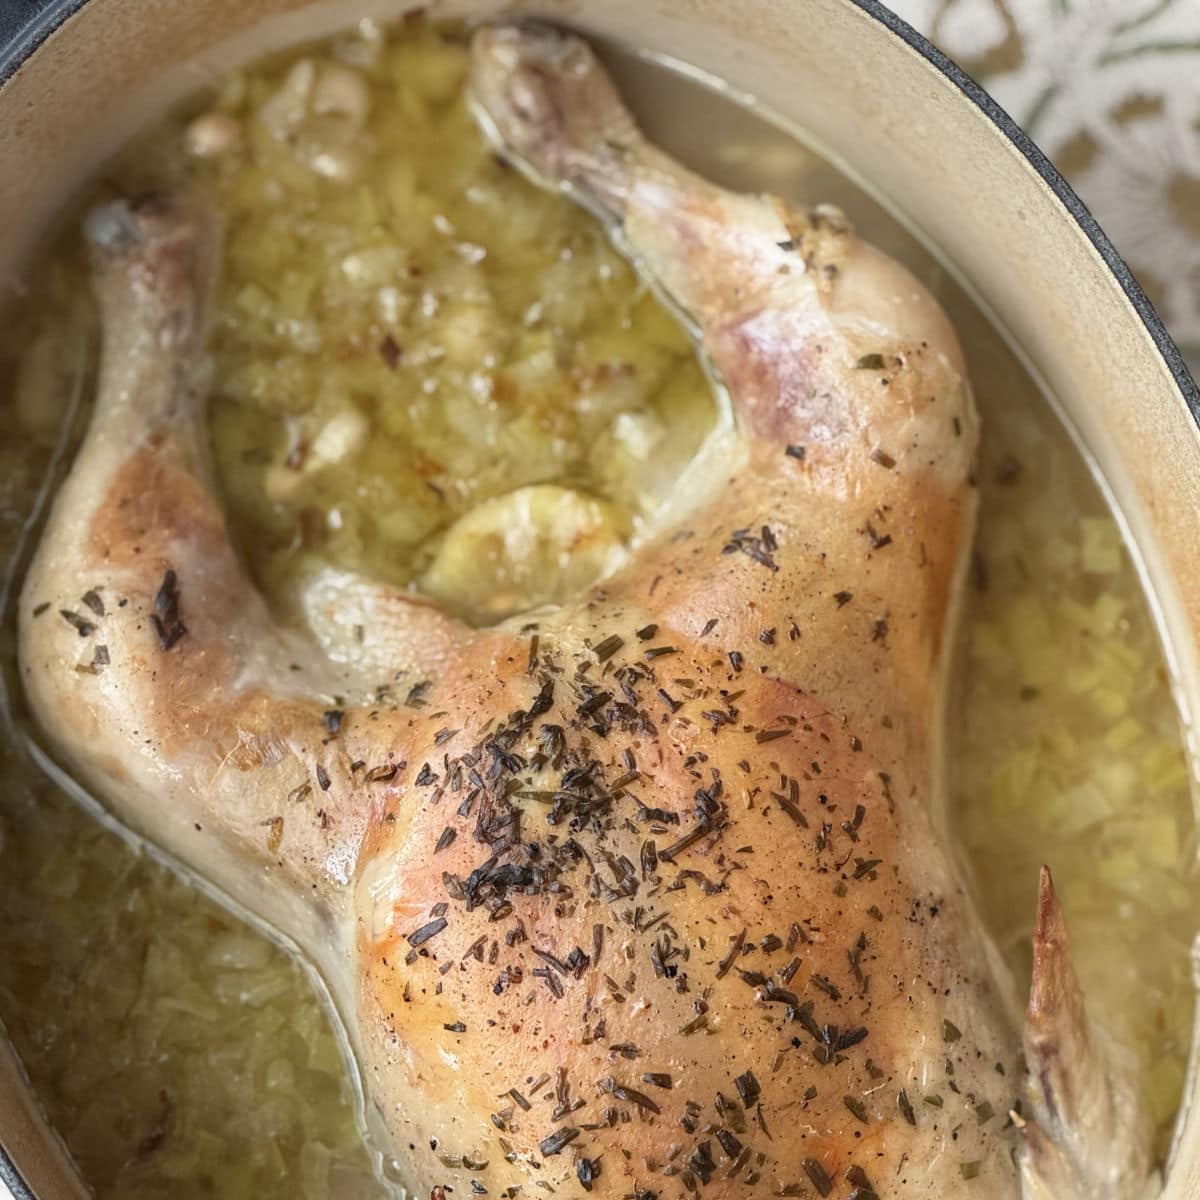
- Aromatics: A small onion, a celery stalk, and garlic cloves provide a savory base. These humble vegetables become intensely flavorful as they cook slowly with the chicken's juices.
- Bay Leaf & Fresh Rosemary (optional): These herbs add classic aromatic notes that complement poultry beautifully. Don't underestimate their subtle contribution to the overall aroma and taste.
- Fresh Lemon Juice: A squeeze at the end brightens the rich flavors and adds a touch of acidity.
Mastering the Low & Slow Technique
The precise steps are straightforward, but attention to detail ensures success:
- Preheat & Position: Set your oven to a low 250 degrees Fahrenheit (120°C). Place an oven rack in the lowest position. This ensures the Dutch oven sits in the optimal heat zone for slow, even cooking.
- Prepare the Chicken: Pat the chicken thoroughly dry with paper towels. This is vital, even without aiming for crispy skin, as it aids in the initial searing process and helps seasonings adhere. Season generously with salt and pepper.
- Initial Sear: Heat olive oil in a heavy-bottomed Dutch oven (one with a tight-fitting lid is essential) over medium heat until just smoking. Carefully place the chicken, breast side down, into the hot oil. While not for crisping, this initial sear develops a layer of flavorful fond on the bottom of the pot.
- Add Aromatics & Cook: Arrange the chopped onion, celery, and whole garlic cloves around and under the chicken. Tuck in the bay leaf and rosemary sprig.
- Seal and Slow Cook: Cover the Dutch oven tightly with its lid. Transfer it to the preheated oven. The low temperature and tight seal are where the magic truly happens. Resist the urge to peek! The chicken will cook for several hours, allowing its juices to circulate and reabsorb.
- Finish with Lemon: Once cooked to perfection (typically when a thermometer inserted into the thickest part of the thigh reads 165°F/74°C), remove the chicken from the pot. Let it rest for 10-15 minutes before carving. Meanwhile, skim the accumulated fat from the delicious pan juices (often called jus) and stir in a squeeze of fresh lemon juice.
This method, brilliantly popularized by Cook's Illustrated French Chicken: Simple, Juicy, Unforgettable, simplifies gourmet results into a remarkably approachable recipe.
Maximizing Flavor and Juices: Tips & Tricks from the Pros
While the core technique is simple, a few expert tips can elevate your French Chicken in a Pot experience even further.
- Fat Separation is Key: After the chicken is cooked and removed, you'll be left with a heavenly amount of flavorful jus. This will likely have a layer of rendered fat on top. To get the purest, richest jus, separate the fat.
- Fat Separator: The easiest method if you own one. Simply pour the contents into the separator and the fat will rise, allowing you to pour off the pure jus from the bottom.
- Measuring Cup Method: If you don't have a separator, pour the jus into a liquid measuring cup. Let it settle for about 5-10 minutes. The fat will rise to the top, allowing you to carefully skim it off with a spoon.
- Refrigeration for Make-Ahead Meals: For future planning, pour the jus into a container, cover, and refrigerate. As it cools, the fat will solidify into a disc on top, which can be easily lifted off and discarded before reheating.
This concentrated jus is liquid gold – perfect for drizzling over the carved chicken, mashed potatoes, or rice.
- Resting Period: Do not skip the resting period after the chicken comes out of the oven. This allows the juices to redistribute throughout the meat, resulting in even more tender and moist results.
- Serving Suggestions: The rich, savory flavor of french chicken in a pot pairs wonderfully with simple sides. Creamy mashed potatoes are an ideal canvas for soaking up the luscious jus. Steamed green beans, roasted root vegetables, or a crisp green salad with a light vinaigrette also make excellent accompaniments. A crusty baguette is practically mandatory for sopping up every last drop of the pan juices.
- Make-Ahead Mastery: This recipe is fantastic for meal prep. The cooked chicken and its jus can be stored in the refrigerator for several days. Reheat gently in the oven or on the stovetop, ensuring the chicken doesn't dry out. The flavors often deepen overnight!
- Using Leftovers: Any leftover chicken can be shredded and used in sandwiches, salads, soups, or even quick chicken tacos. The concentrated flavor makes it an incredibly versatile ingredient.
Conclusion
The French Chicken in a Pot method is a revelation for anyone seeking truly moist, intensely flavored chicken. By embracing a low-and-slow approach in a tightly sealed environment, and letting the chicken cook in its own concentrated juices, you achieve a depth of succulence that often eludes other cooking methods. While you might miss the crispy skin of a traditional roast, the trade-off for incredibly tender, flavorful meat is one you'll be happy to make. It's a testament to the power of simple ingredients, thoughtful technique, and a touch of French culinary inspiration. Give this secret method a try, and discover a new favorite way to enjoy perfectly cooked chicken.
